
The Canny Edge Detector
Introduction the edge detector
Series: The Canny Edge Detector:
- Introduction the edge detector
- Implementing Canny Edges from scratch
A lot of people consider the Canny Edge Detector the ultimate edge detector. You get clean, thin edges that are well connected to nearby edges. If you use some image processing package, you probably get a function that does everything. Here, I'll go into exactly how they work.
Overview
The canny edge detector is a multistage edge detection algorithm. The steps are:
- Preprocessing
- Calculating gradients
- Nonmaximum suppression
- Thresholding with hysterysis
The two key parameters of the algorithm are - an upper threshold and a lower threshold. The upper threshold is used to mark edges that are definitely edges. The lower threshold is to find faint pixels that are actually a part of an edge.
Preprocessing
Edge detectors are are prone to noise. A bit of smoothing with a Gaussian blur helps. From what I've seen, software packages don't do this step automatically, you need to do this yourself.
Usually, a 5x5 Gaussian filter with standard deviation = 1.4 is used for this purpose.
Calculating gradients
Next, gradient magnitudes and directions are calculated at every single point in the image. The magnitude of the gradient at a point determines if it possibly lies on an edge or not. A high gradient magnitude means the colors are changing rapidly - implying an edge. A low gradient implies no substantial changes. So it's not am edge.
The direction of the gradient shows how the edge is oriented.
To calculate these, the standard sobel edge detector is used.
The magnitude of gradient is 


Once we have the gradient magnitudes and orientations, we can get started with the actual edge detection.
Nonmaximum supression
This step does exactly what it means - if a pixel is not a maximum, it is suppressed. To do this, you iterate over all pixels. The orientation of each pixel is put into one of the four bins. Why? Have a look at this:

Possible directions of an edge
Let's say you're at the grey pixel. There are only four possible edges possible - it could either go from north to south (the green neighbors), from east to west (the blue ones) or one of the diagonals (the yellow or red neighbors). So using the current pixel's gradient direction, you try and estimate where the edge is going.
Most computer vision packages do not use the coordinate system you use in your geometry class - The X axis increases from left to right (the usual way) but the Y axis increases from top to down (the opposite way). So slope directions change.
The four possibilities need to be treated separately to check for nonmaximum suppression. I'll explain one possibility in detail. The others are the same, with minor differences.
Gradient orientation from 22.5 to 67.5 degrees
 If the gradient orientation is in this range means change is occurring in this direction - from the top left corner to the bottom right corner. This means the edge lies from the top right corner to bottom left (the red line).
To check if the central red pixel belongs to an edge, you need to check if the gradient is maximum at this point. You do this by comparing its magnitude with the top left pixel and the bottom right pixel.
If it is maximum _and _its magnitude is greater than the upper threshold, you mark this pixel as an edge.
Think about it for a moment. It makes perfect sense intuitively.
An edge is always perpendicular to the gradient direction. Intensities do not change along an edge - they change across the edge.
Other gradient orientations
Other gradient directions are handled similarly:
- 67.5 to 112.5 degrees: The gradient is from top to bottom. This means the edge is from left to right. So you check gradient magnitudes against the pixels right above and below.
- 112.5 to 157.5 degrees: The gradient is the other diagonal.
- 0-22.5 or 157.5-180 degrees: The gradient is horizontal. So the edge is vertical. So you check the pixels to the left and right.
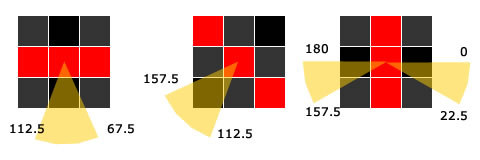
The three remaining cases: The edge is marked by red and the central pixel is compared to the dark pixels
After nonmaximum suppression, you'll get something called 'thin edges'. This might be broken at various points. We'll fix this by filling in gaps with another threshold (with hysteresis).
Thresholding with Hysterysis
In the previous step, we marked pixels that had a gradient magnitude greater than the upper threshold. Now using the direction information and the lower threshold, we'll "grow" these edges.
Here's the idea:
- If the current pixel is not an edge, check the next one.
- If it is an edge, check the two pixels in the direction of the edge (ie, perpendicular to the gradient direction). If either of them (or both)
- Have the direction in the same bin as the central pixel
- Gradient magnitude is greater than the lower threshold
- They are the maximum compared to their neighbors (nonmaximum suppression for these pixels), then you can mark these pixels as an edge pixel
- Loop until there are no changes in the image Once the image stops changing, you've got your canny edges! That's it! You're done!
More in the series
This tutorial is part of a series called The Canny Edge Detector:
- Introduction the edge detector
- Implementing Canny Edges from scratch
Related posts


