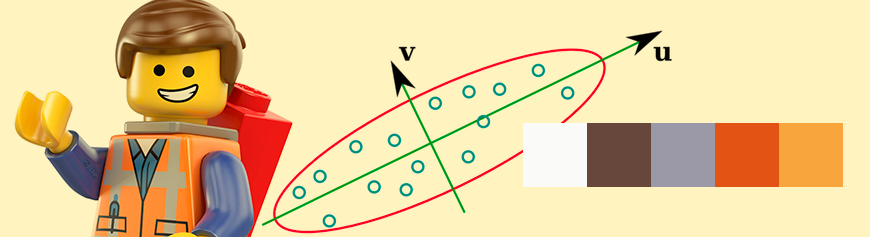
Finding dominant colors in an image
Additional functions to view what's happening
Series: Finding dominant colors in an image:
- Eigenvectors
- Implemention in OpenCV
- Additional functions to view what's happening
Tree traversal functions
These are standard algorithm oriented functions. I used breadth first traversal of the tree in all functions.
Get a list of all leaves in the tree
Let's start with a relatively simple, data structures and algorithms type function.
std::vector<t_color_node*> get_leaves(t_color_node *root) {
    std::vector<t_color_node*> ret;
    std::queue<t_color_node*> queue;
    queue.push(root);
We setup some variables - the vector we want to return, the BFS queue and push the root node to the queue.
    while(queue.size() > 0) {
        t_color_node *current = queue.front();
        queue.pop();
We fetch the node at the head of the queue and remove it from the queue. Now let's look at processing it.
        if(current->left && current->right) {
            queue.push(current->left);
            queue.push(current->right);
            continue;
        }

        ret.push_back(current);
    }
    return ret;
}
If the node we just got from the queue has both left and right pointers set, it is definitely not a leaf. However, we do want to explore both left and right pointers - so we put them into the queue. Note that there will never be a case when either only left or only right is set.
If it doesn't have both the left and right pointers, it is a leaf - push that into the return vector.
Finally, when there's nothing remaining on the queue, we return the vector we've gathered until now.
Getting the next class ID
One of the functions we used for partitioning was to get the next class ID. This requires traversing the tree and figuring out the largest integer that has not been used by a class until now. We do that in this function here.
int get_next_classid(t_color_node *root) {
    int maxid = 0;
    std::queue<t_color_node*> queue;
    queue.push(root);

    while(queue.size() > 0) {
        t_color_node *current = queue.front();
        queue.pop();
This is very similar to the previous function. We setup a BFS queue. We also have a variable that stores that maximum ID we've encountered until now. We start iterating until the queue turns empty. We fetch what's at the front of the queue and remove it from the queue.
        if(current->classid > maxid)
            maxid = current->classid;

        if(current->left)
            queue.push(current->left);

        if(current->right)
            queue.push(current->right);
    }

    return maxid + 1;
}
Now we check if the class ID of the current node is greater than any that we've encountered. If so,that becomes the largest class ID. We also push the left and right pointers, if they exist. Finally, we add 1 to the maximum we've seen - and that becomes the next available class ID.
Get the dominant colors, given a color tree
Here, we finally write a function that returns the actual std::vector of colors that are dominant.
std::vector<cv::Vec3b> get_dominant_colors(t_color_node *root) {
    std::vector<t_color_node*> leaves = get_leaves(root);
    std::vector<cv::Vec3b> ret;
We use the get_leaves function to fetch the leaves of the tree. ret is the list of colors (in the 0-255 range).
    for(int i=0;i<leaves.size();i++) {
        cv::Mat mean = leaves[i]->mean;
        ret.push_back(cv::Vec3b(mean.at<double>(0) * 255.0f,
                                mean.at<double>(1) * 255.0f,
                                mean.at<double>(2) * 255.0f));
    }

    return ret;
}
This is a fairly self explanatory loop. Go throug the leaves, fetch the mean of each node and multiply it by 255. Append this to the return list. And finally return the vector.
Viewing functions
These functions are only for your viewing pleasure! Here's the batman lego figure I've used for this example. Have fun!

I'm Batman!
Fetch the quantized image
We have a bunch of average colors (one for each node). The idea here is to replace the original color at every pixel with the average color of the class it belongs to.
cv::Mat get_quantized_image(cv::Mat classes, t_color_node *root) {
    std::vector<t_color_node*> leaves = get_leaves(root);

    const int height = classes.rows;
    const int width = classes.cols;
    cv::Mat ret(height, width, CV_8UC3, cv::Scalar(0));
Here, we fetch the leaves of the tree (those are the only colors that really matter). Then we create some convenience variables (height and width) and finally the image we'll return ret.
    for(int y=0;y<height;y++) {
        uchar *ptrClass = classes.ptr<uchar>(y);
        cv::Vec3b *ptr = ret.ptr<cv::Vec3b>(y);
        for(int x=0;x<width;x++) {
            uchar pixel_class = ptrClass[x];
This is the standard for-loop structure to loop through an image. We loop through the RGB data of the return image (we want to set the quantized color) and also the classes image (we want to figure out which class each pixel belongs to).
            for(int i=0;i<leaves.size();i++) {
                if(leaves[i]->classid == pixel_class) {
                    ptr[x] = cv::Vec3b(leaves[i]->mean.at<double>(0)*255,
                                       leaves[i]->mean.at<double>(1)*255,
                                       leaves[i]->mean.at<double>(2)*255);
                }
            }
        }
    }

    return ret;
}
Here's we find the class corresponding to the leaf and simply set the pixel's RGB value to the average RGB of the class. This makes our quantized image.

The quantized image using 6 colors.
Segmentation image
You could use this technique to perform crude color based segmentation. Here's a function that let's you view the image in a different way.
cv::Mat get_viewable_image(cv::Mat classes) {
    const int height = classes.rows;
    const int width = classes.cols;

    const int max_color_count = 12;
    cv::Vec3b *palette = new cv::Vec3b[max_color_count];
    palette[0]  = cv::Vec3b(  0,   0,   0);
    palette[1]  = cv::Vec3b(255,   0,   0);
    palette[2]  = cv::Vec3b(  0, 255,   0);
    palette[3]  = cv::Vec3b(  0,   0, 255);
    palette[4]  = cv::Vec3b(255, 255,   0);
    palette[5]  = cv::Vec3b(  0, 255, 255);
    palette[6]  = cv::Vec3b(255,   0, 255);
    palette[7]  = cv::Vec3b(128, 128, 128);
    palette[8]  = cv::Vec3b(128, 255, 128);
    palette[9]  = cv::Vec3b( 32,  32,  32);
    palette[10] = cv::Vec3b(255, 128, 128);
    palette[11] = cv::Vec3b(128, 128, 255);

    cv::Mat ret = cv::Mat(height, width, CV_8UC3, cv::Scalar(0, 0, 0));
Here, we create a palette for the different classes. Any pixel that belongs to the class 1 will be given the color (255, 0, 0).
    for(int y=0;y<height;y++) {
        cv::Vec3b *ptr = ret.ptr<cv::Vec3b>(y);
        uchar *ptrClass = classes.ptr<uchar>(y);
        for(int x=0;x<width;x++) {
            int color = ptrClass[x];
            if(color >= max_color_count) {
                printf("You should increase the number of predefined colors!\n");
                continue;
            }

            ptr[x] = palette[color];
        }
    }

    return ret;
}
And that's a simple loop through the entire image ret. As always, we also simultaenously loop through the classes image. If the class a particular pixel belongs to is larger than the predefined palette, we print out a message (you, the dev, should incorporate more colors in the palette)!. Otherwise, we simply set the pixel color to the corresponding palette color.
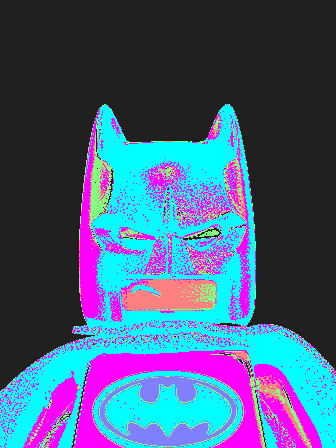
The "segmentation" view for batman (6 colors)
Generating the dominant color palette
Here's a nice way to visualize the palette. A lot of online palette generators use this format to show a color palette. It consists of a bunch of squares colored with the corresponding color.
cv::Mat get_dominant_palette(std::vector<cv::Vec3b> colors) {
    const int tile_size = 64;
    cv::Mat ret = cv::Mat(tile_size, tile_size*colors.size(); CV_8UC3, cv::Scalar(0));
Here, we define a tile_size - the size of the square. The output palette will be these many pixel tall and n * tile_size, where n is the number of colors in the palette.
    for(int i=0;i<colors.size();i++) {
        cv::Rect rect(i*tile_size, 0, tile_size, tile_size);
        cv::rectangle(ret, rect, cv::Scalar(colors[i][0], colors[i][1], colors[i][2]), CV_FILLED);
    }

    return ret;
}
We loop through all the colors and create the corresponding colored tiles.

The color palette for batman (6 colors)
Wrap up
And that's all folks! This should set you up to get this code running on your own machine. Hopefully you found this useful and insightful. I found this particularly useful for techniques like a GMM - where an initialization matters a lot!
Source code
You can get the source code for this tutorial on Github.
References
- M Orchard and C Bouman, Color Quantization of Images, Transactions on Signal Processing, 1991
More in the series
This tutorial is part of a series called Finding dominant colors in an image:
- Eigenvectors
- Implemention in OpenCV
- Additional functions to view what's happening
Related posts


